Quick Start
BaseRock allows users to test their application on 2 levels:
- Integration testing level
- Business use case–based end-to-end testing level
As shown in the diagram below, you can see how it works.
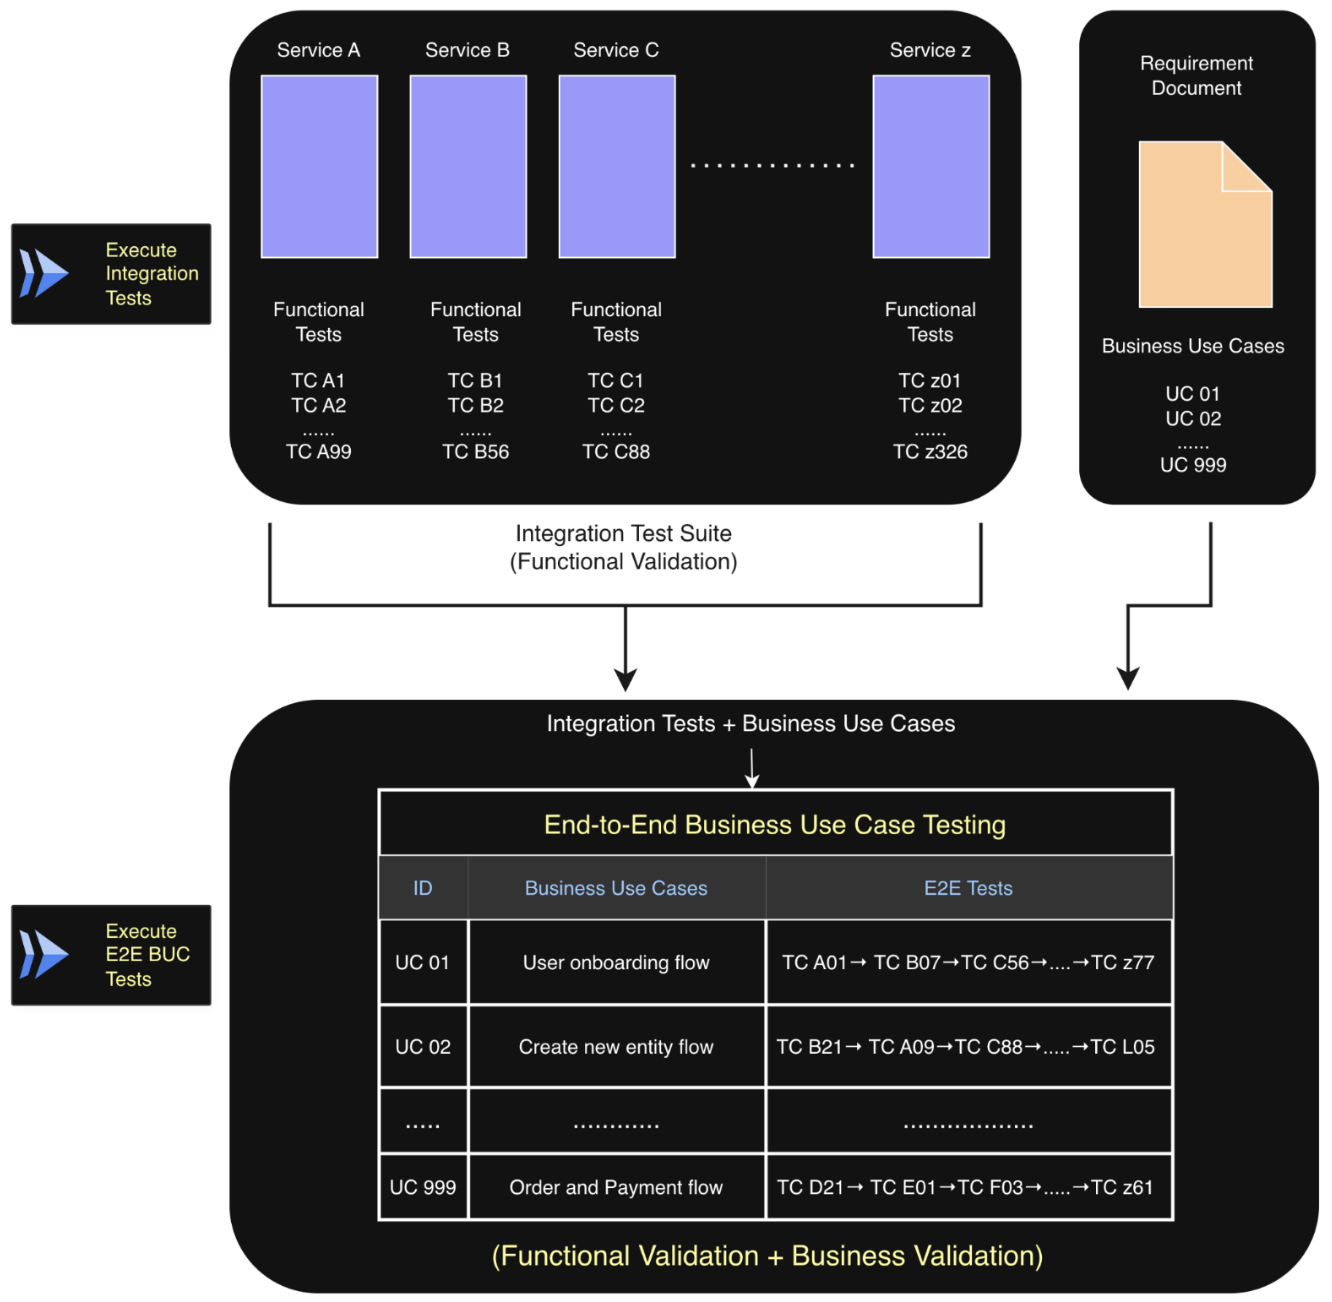
Business use case tests require onboarded services and a requirements document, whereas integration tests only require the onboarded services in BaseRock.
In this section, we’ll show how to quickly get started with integration testing in BaseRock. In the next section, we’ll cover how to extend your tests to business use case–based end-to-end testing.
Below is the integration testing workflow in BaseRock.
flowchart TD
  classDef phase1 fill:#eceff1,stroke:#90a4ae,color:#263238
  classDef phase2 fill:#e8eaf6,stroke:#5c6bc0,color:#1a237e
  classDef phase3 fill:#e8f5e9,stroke:#43a047,color:#1b5e20

  A[Login]:::phase1
  B[Add Service]:::phase3
  C[Update Service Config]:::phase3
  D[Create Test Cases]:::phase3
  E[Generate Playbook]:::phase2
  F[Run Test]:::phase2

  A --> B
  B -.-> C
  B --> D
  C -.-> E
  D --> E
  E --> F
1. Add a Service
Adding a service in BaseRock allows users to discover all the available endpoints present in their respective microservice. Click the “Add Service” button in the top-right corner to open the service creation form and provide the details.

For monolithic repositories, users can create BaseRock services that logically represent a specific section of the monolith. Each service corresponds to one or more application modules in which the monolith is structured, and should be named accordingly.
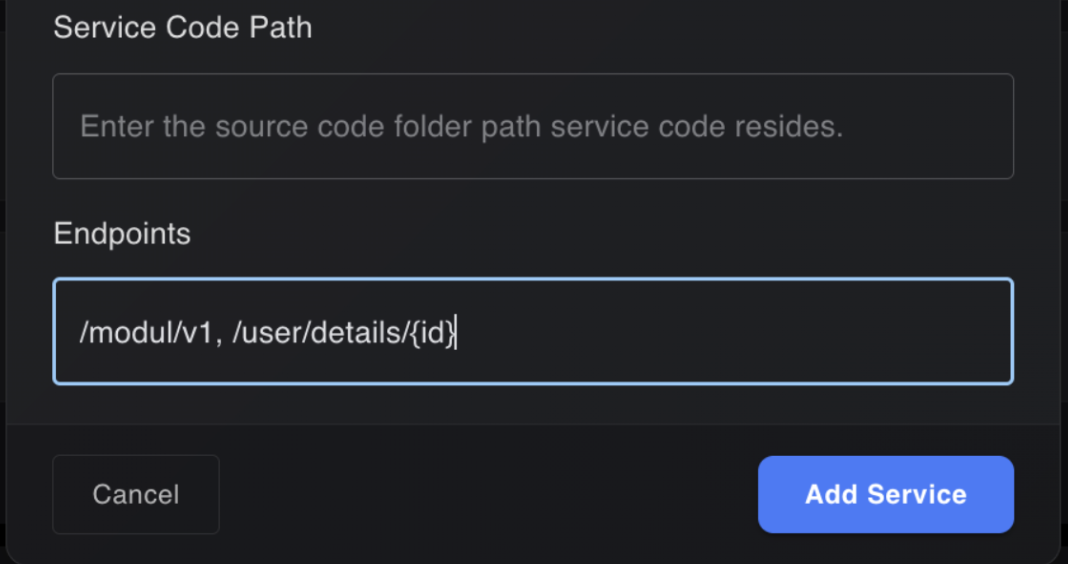
To discover endpoints associated with these modules, users can choose one of two approaches: 1. Provide a Service Code Path pointing to the relevant module(s), or 2. Specify routers or controllers in the Endpoints text area, where they can list either individual endpoints or entire routers/controllers.
In the above screenshot “/module/v1” will discover all the endpoints that belong inside this controller/router and it will also discover the exact endpoint named as “/user/details/{id}”
Specification Document (Optional)
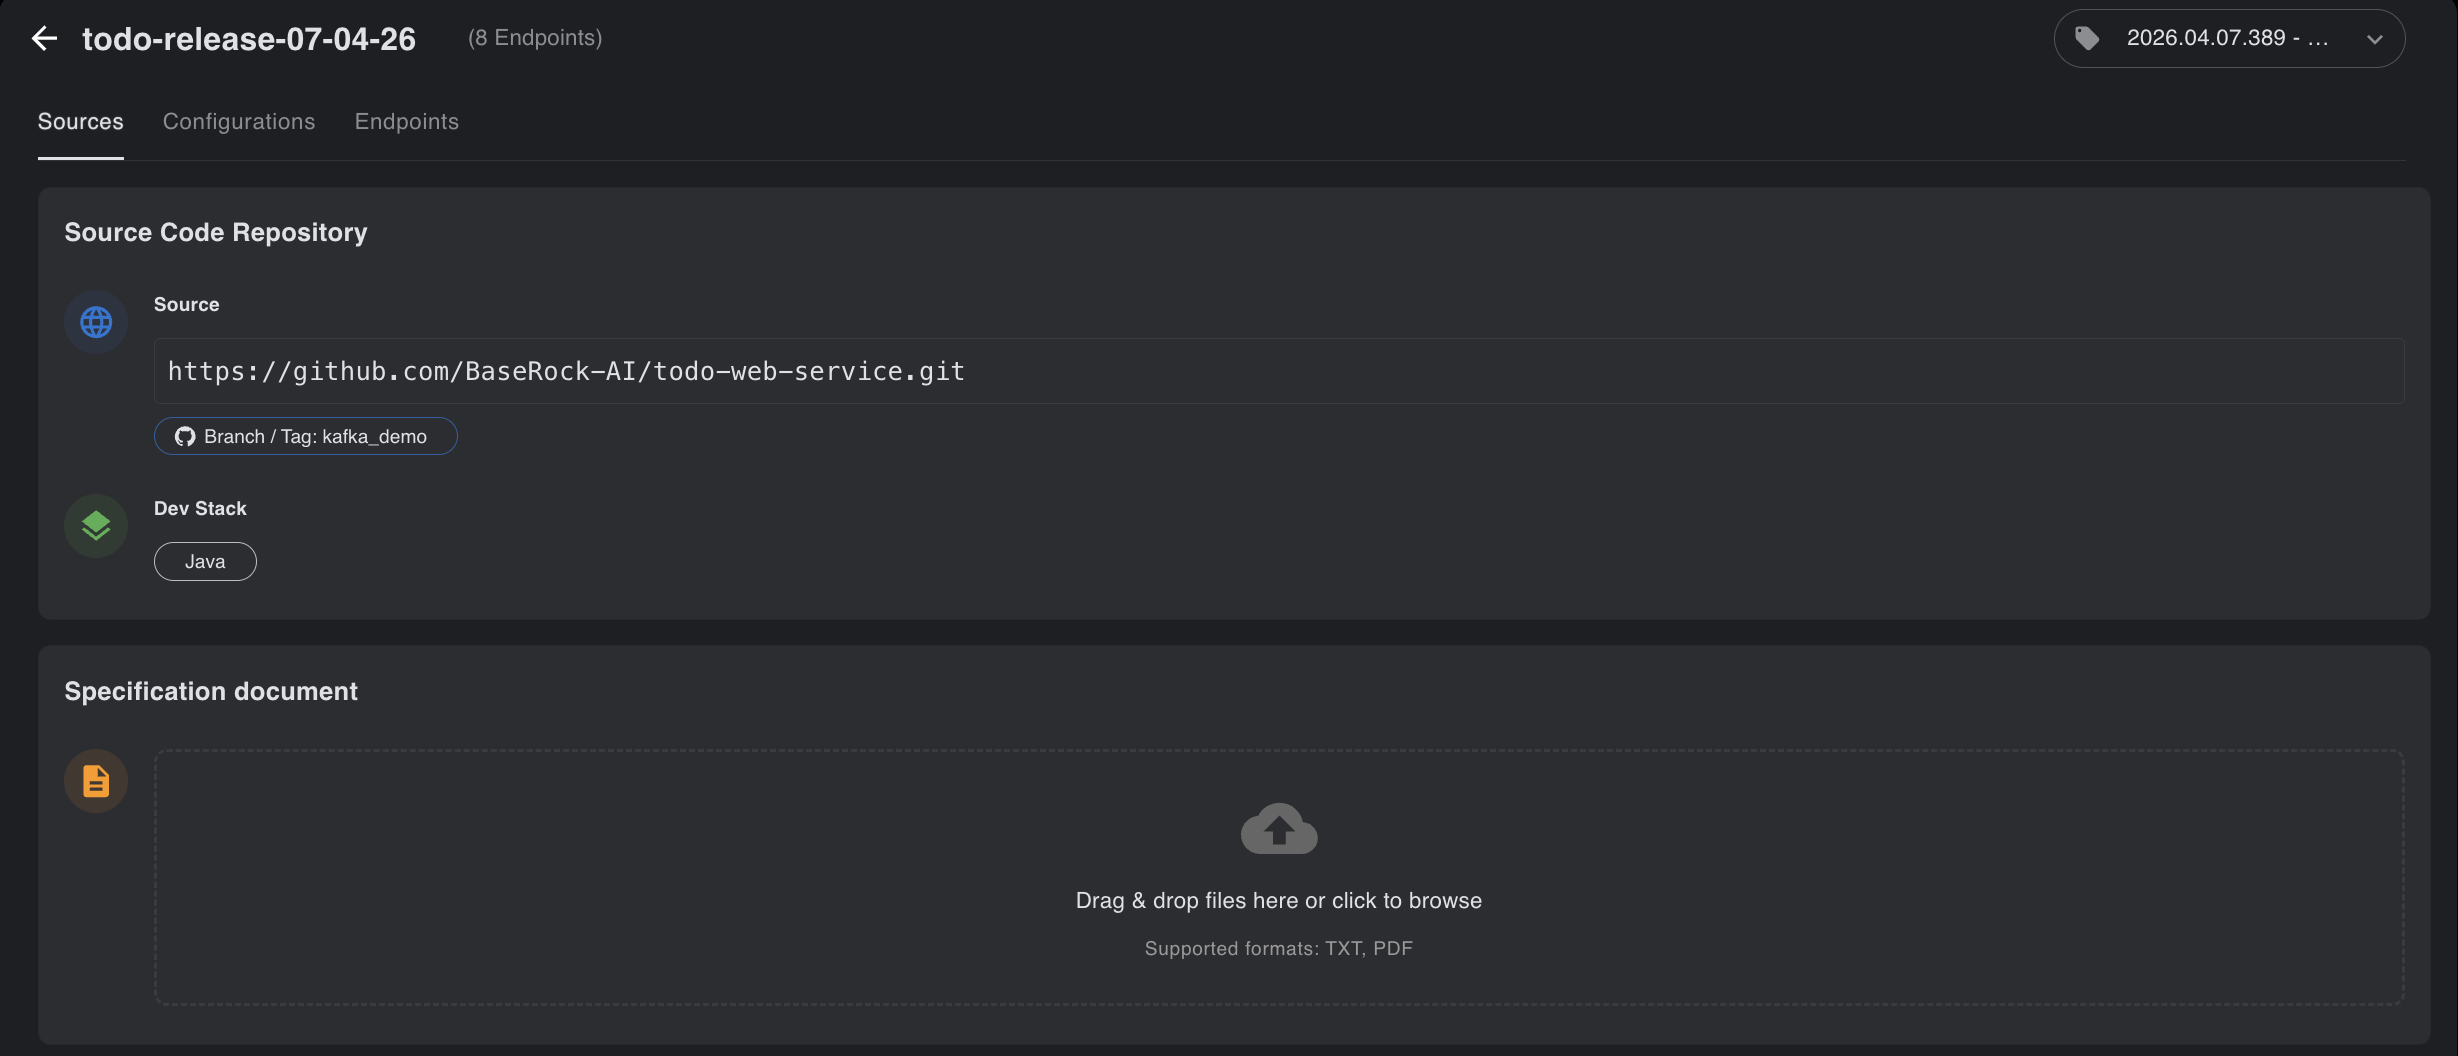
After creating the service, users can upload an API specification document, which is completely optional and only used by BaseRock to gather more context about the service under test. The document content does not need to follow any specific formatting. Supported document types are .txt and .pdf, with a maximum total size of 10MB.
Note
Specification document is completely optional but highly recommended as, this allows BaseRock to gather API details, API rules, request and response examples, validation checkpoints, etc ensuring minimal effort from users to set configurations and generate higher quality integration tests.
2. Create Test Cases
The test cases depend on:
- Source code read from repository
- Specification document uploaded by user (optional)
- Prompt given by user (optional)
Test cases can be generated from two places - within the business flow or within the above created service. Here, the objective is to perform only integration testing, so we’ll focus on generating test cases from within the service and not from the business flow page.
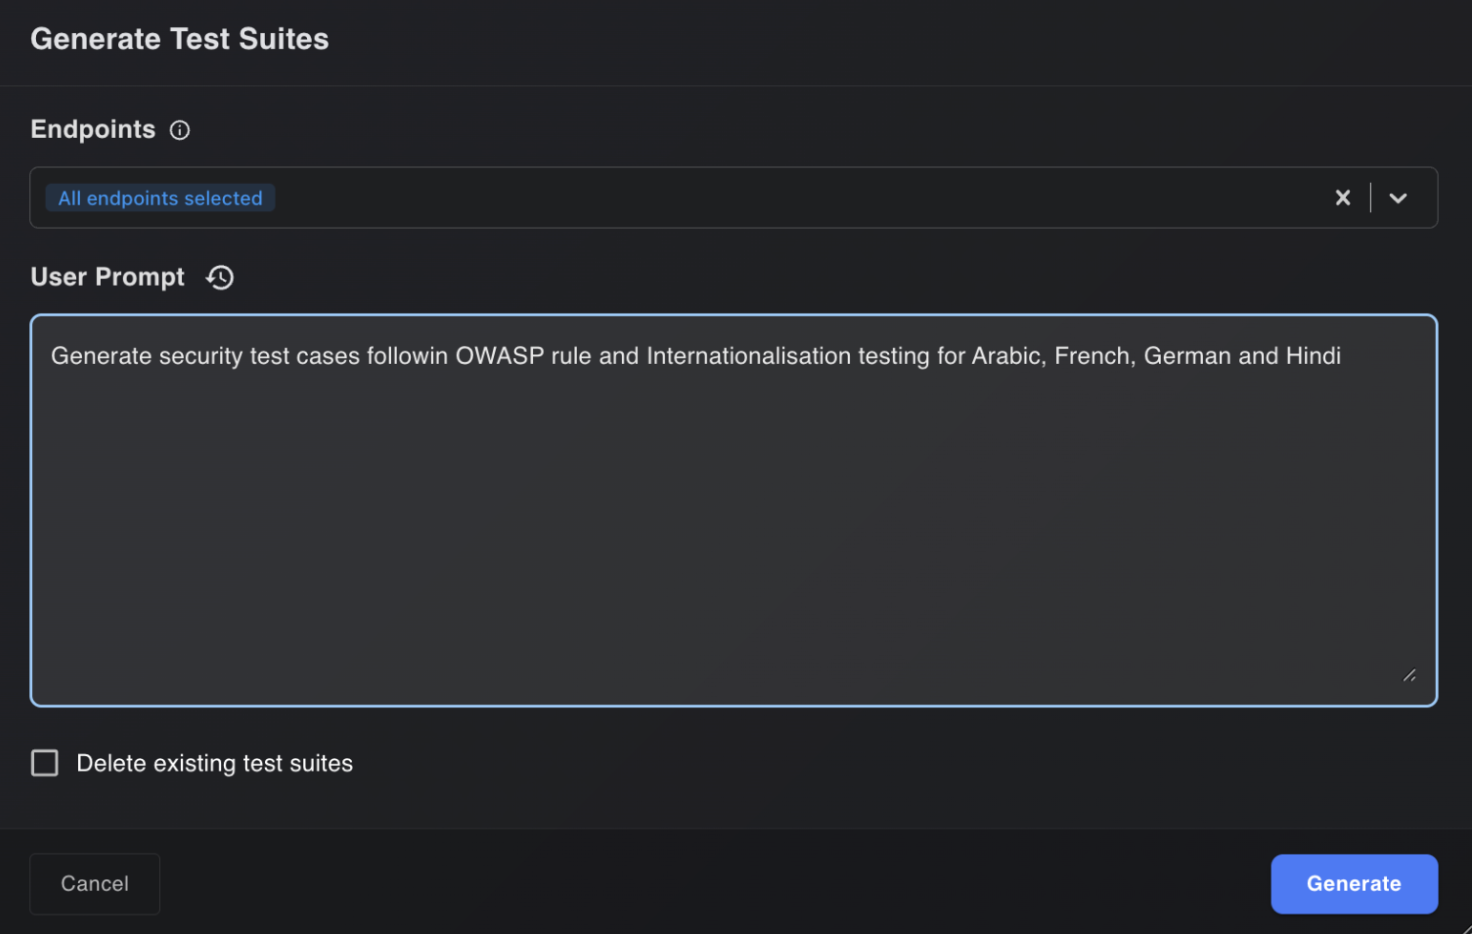
When inside an individual service, the user can click the three dots in the top-right corner and click “Generate Test Cases”. A window will be shown (as above) where the user can either provide a prompt with domain-specific instructions or simply click Generate to create an optimized number of test cases based on the source code.
The final results will look similar to what is shown below:
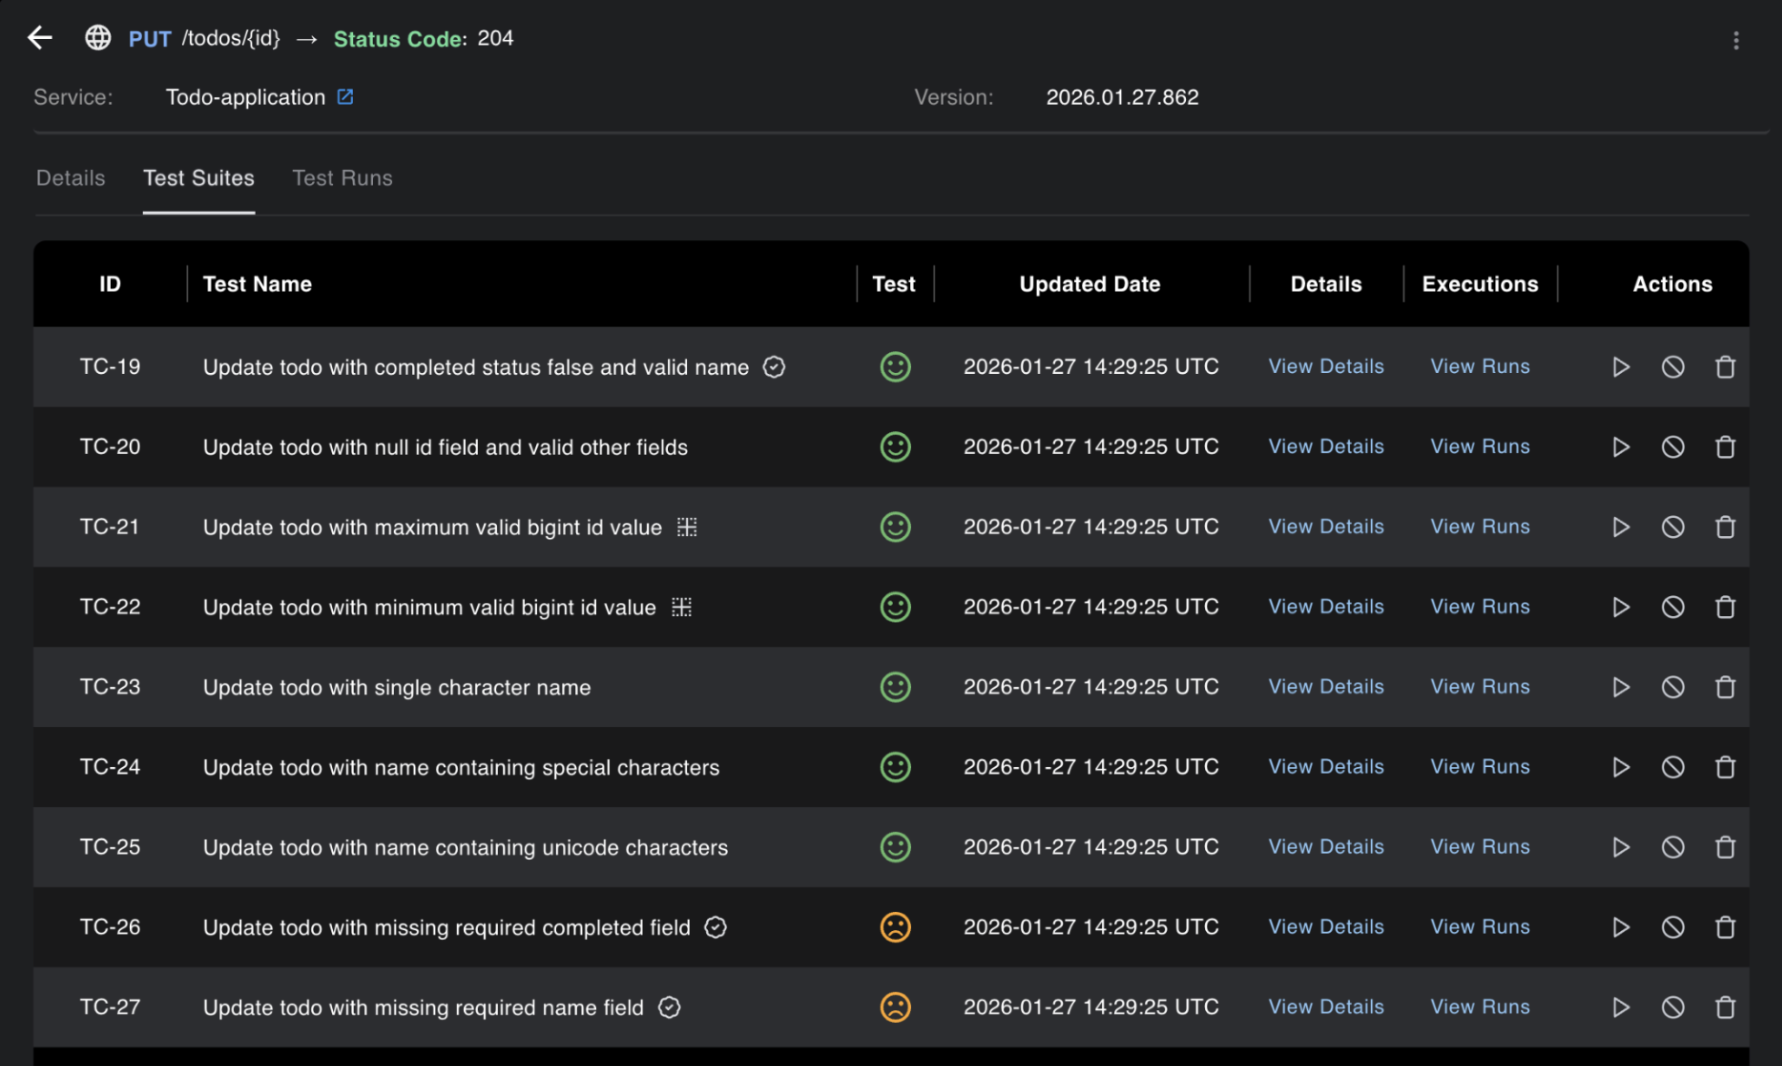
3. Update Service Configuration and Generate Playbooks
- Go to the Configuration tab inside the service and fill it as shown here: configurations.
Focus on creating context variables and answering all the open questions. For example, if the API requires authentication, make sure it is set up in the Configurations tab before proceeding.
Users can also perform special actions such as capturing the system date/time, generating random strings or numbers and storing them in variables for later use, looping a test at a specific interval, or asking BaseRock to use an existing value in a payload at runtime by writing it in the service-level playbook text area.
- Once the service-level configurations are updated, click the three dots inside the Endpoints tab and select Generate Playbooks. After some time, the user should see the endpoint-level playbooks populated automatically. The user can further edit these steps manually in simple, plain English and save.
The example below shows why configuration setup and playbooks are important to set before any test run:
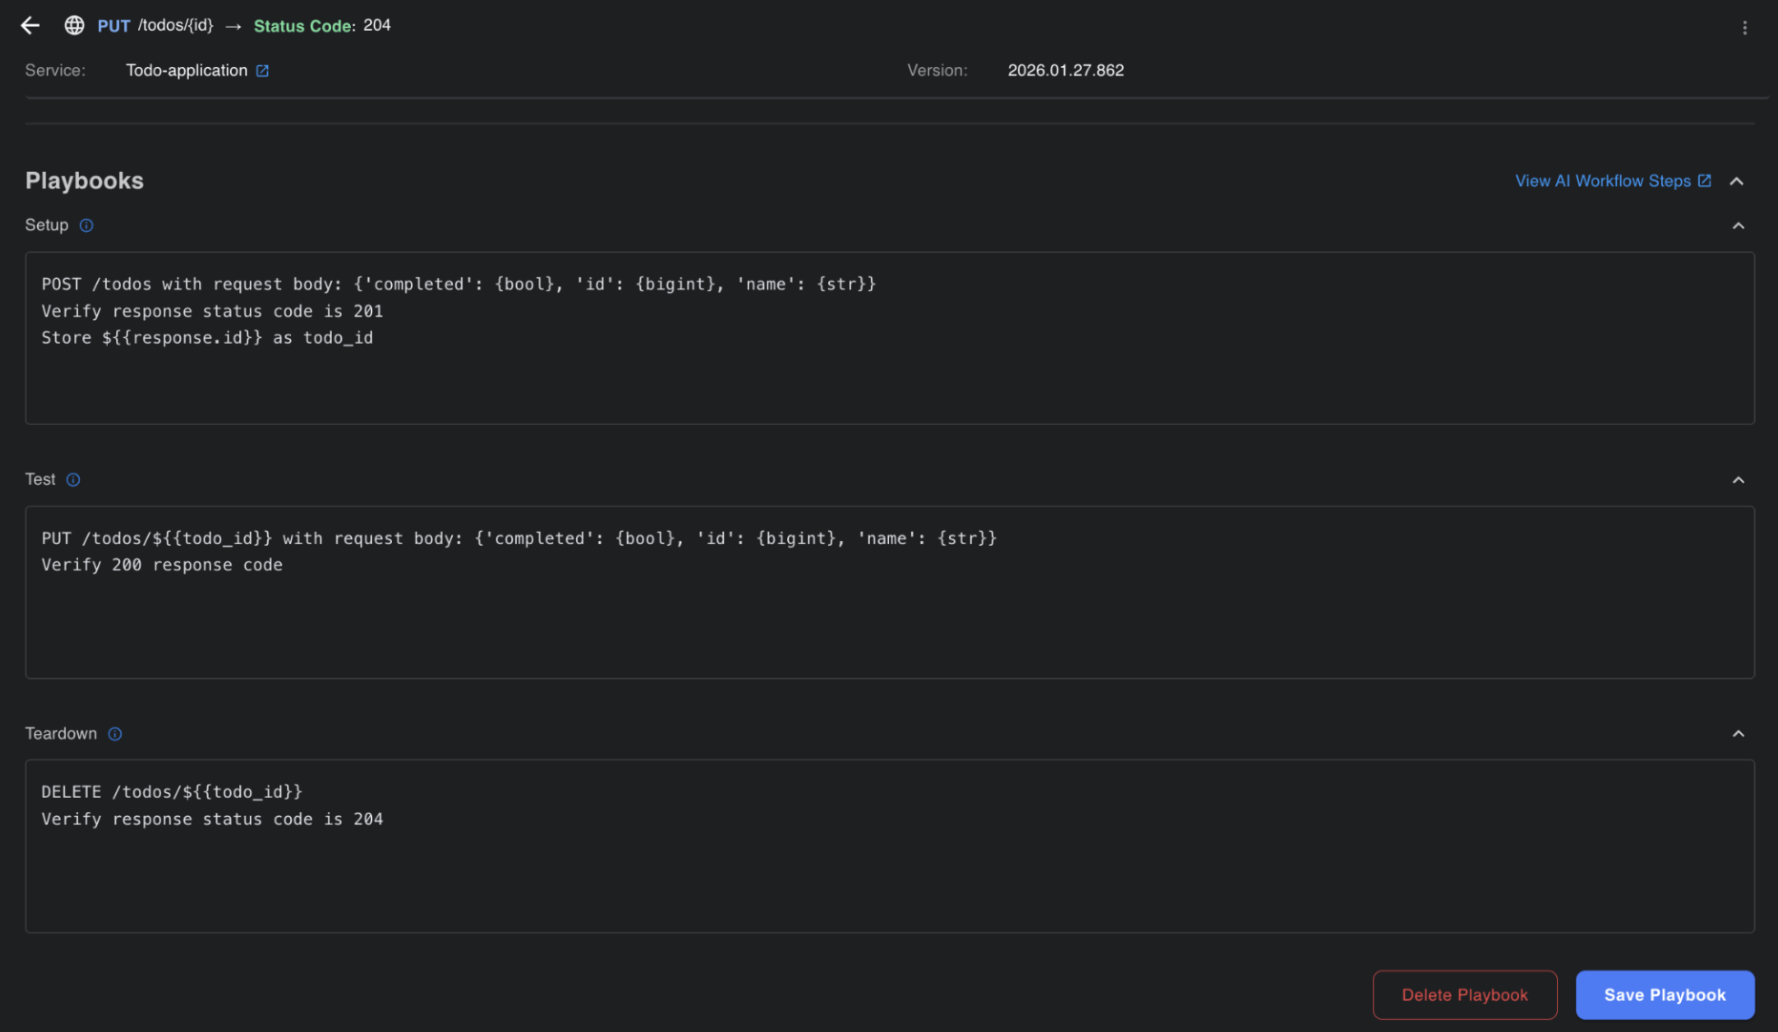
In the above screenshot:
The goal is to test the PUT /todos/${{todo_id}} endpoint. However, to automate this test, a todo item must always exist so that the PUT endpoint has a resource to update.
In automated testing, it is standard practice to execute the full flow from the beginning, even when the objective is to validate an intermediate step (in this case, the PUT endpoint).
Therefore, we use the Playbooks (Setup) section to create a todo item at the start of every test run. This ensures that a valid todo item is always available for the update operation. During this setup step, the system-generated todo_id is captured at runtime and stored for reuse in the subsequent PUT request.
After the PUT operation is tested, a postcondition step executes a DELETE request to remove the created todo item. This cleanup step prevents test data from accumulating in the database across multiple test executions.
For a further understanding of playbooks, refer to the section: Understanding Playbooks.
4. Running Tests
Tests can be executed in two ways:
- A single test case to perform dry runs quickly and ensure users are going in the right direction.
Follow the steps:
- Go to the generated test case and you will see a triangular run button corresponding to it.
- Click it, select the agent, select the environment, and enter the base URL under test
- Click Run
- You will be navigated to the Test Run page, and the execution logs will appear in your terminal.
Once the execution is over, you will see the final results on the UI inside Test Runs section on the left panel.
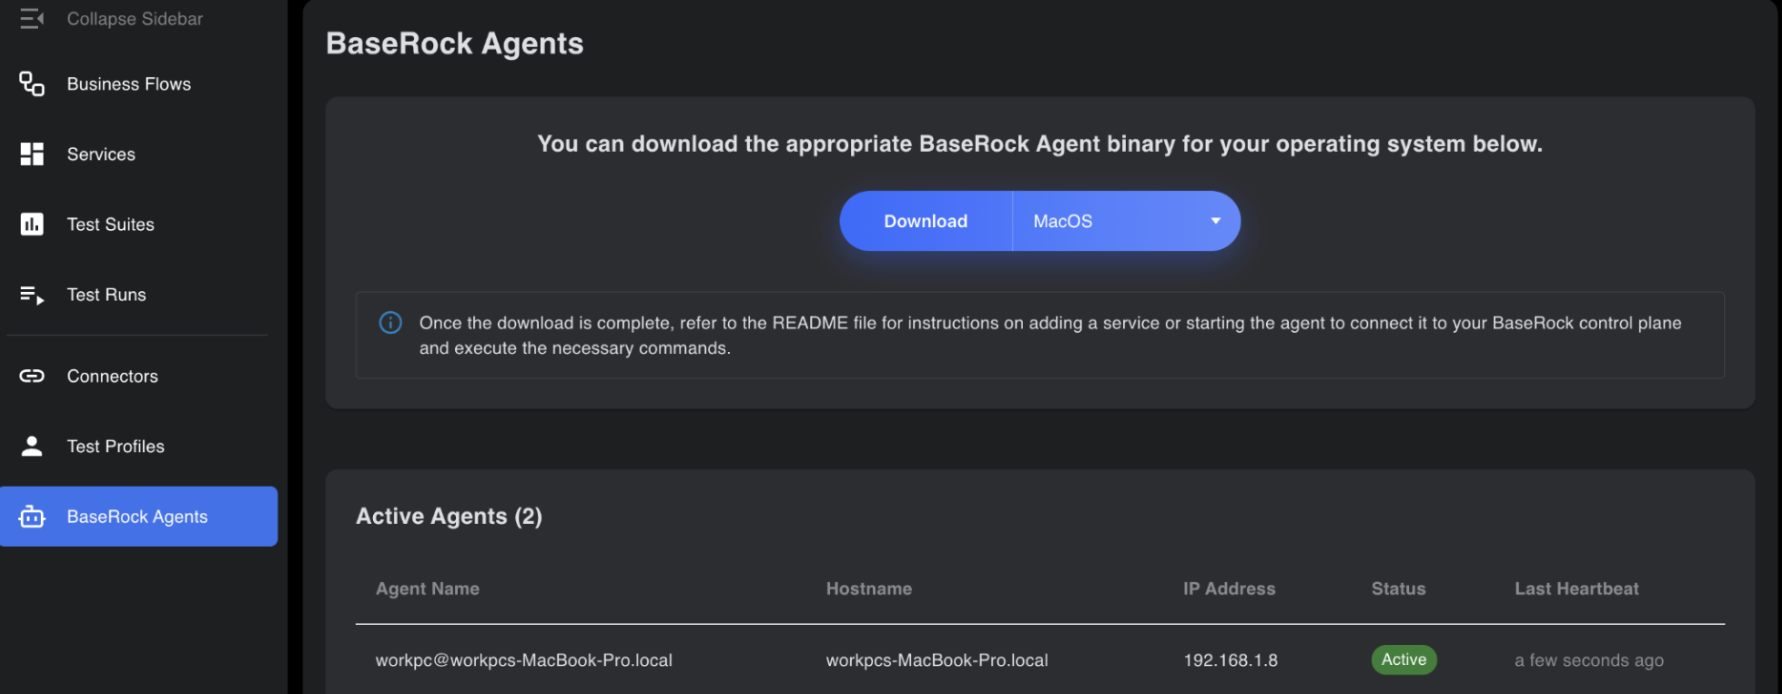
Note
To run a test case via the BaseRock UI, the user must ensure that the BaseRock agent is actively running on the machine where execution should take place.
- Multiple test runs (e.g., smoke, regression, or all tests of a single service) can be done by configuring the run_tests.sh file as needed and running it via CLI or CI/CD pipeline. See the Execute test suite section for examples.
User can set preconditions and postconditions for testing an endpoint (e.g., authentication before triggering an API and deletion of test data after execution) as shown in above section.